Once I found this cute cast iron muffin tin, like this one, I knew I was going to have to test out some muffins for breakfast. I’ve mentioned this before but I used to make my own pancake/baking mix before a camping trip until I learned about Kodiak Pancake Mix which can be used for many different baking items, I haven’t looked back. It is easy to use, delicious and packed with protein! I highly recommend if you haven’t checked them out before.
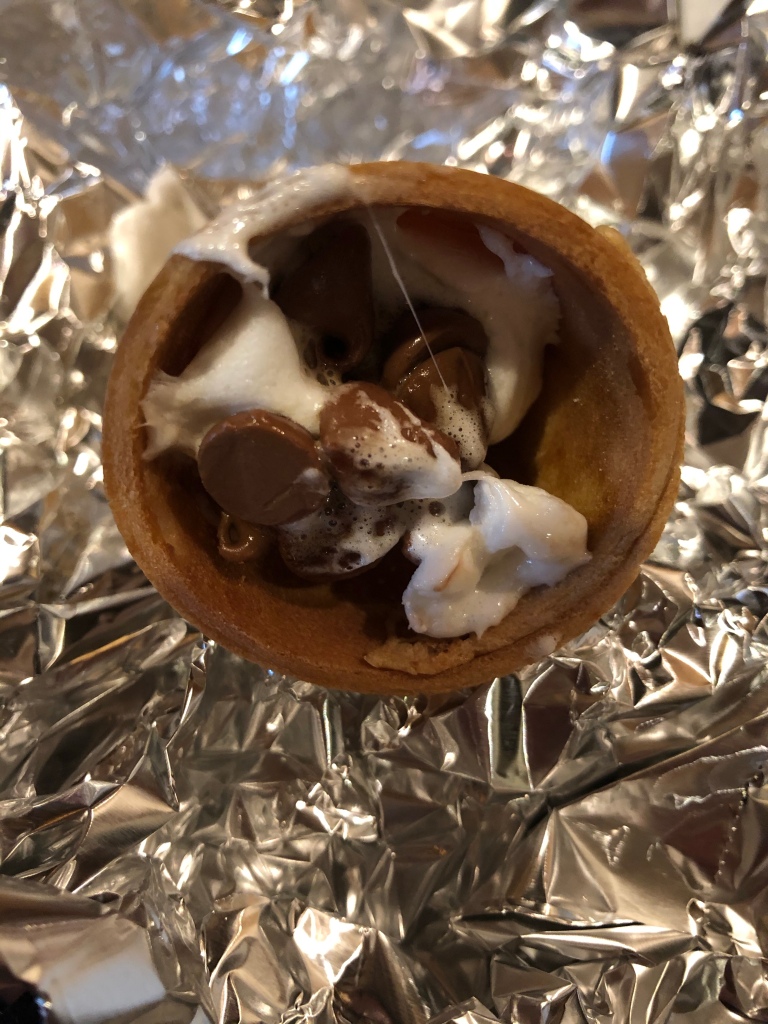
This is one of my favorite desserts for camping that is super easy to make. All you need to do is take anything you might want to stuff in the cone and wrap in foil and place on the campfire grill for about 15 minutes until inside is melted and cone is warmed.
Gooey Delicious S’mores
Ingredients:
Waffle Cones
Mini marshmallows
Mini chocolate chips
Aluminum foil
Peanut butter, butterscotch chips, banana – whatever additions your heart desires that fit in the cone
Directions:
Rip off a sheet of aluminum foil
Stuff the waffle cone full with your desired ingredients
Wrap waffle cone in the aluminum foil and put on a campfire grill in indirect heat
Heat for about 15 minutes or until inside ingredients are melted and cone is warmed (might require a couple of checks)
So while you can definitely make these simply at your campsite with the ingredients and a bowl, I like to make ahead to save time in the morning. You can also freeze these after making which helps keep the cooler cold
I am also lucky to have Oaktown Spice Shop locally and highly recommend their spice blends especially this breakfast sausage one. Yes, you can make your own spice blend but theirs is so tasty, I haven’t made one in years!
Ingredients –
1 lb. ground turkey
Salt
Oaktown Spice Shop Breakfast Sausage blend
Maple syrup (optional)
Directions –
Knead 2 tsp. salt into 1 lb. ground turkey for a few minutes in a large bowl
Add 2 tbsp. of breakfast sausage spice and mix together with hands
Add 1-2 tsp. maple syrup depending on how sweet you like making sure patties remain sticky
Form into small patties
Heat oil in a fry pan
Add patties to pan and cook for about 5 minutes
Flip and cook for another 5 minutes or until the center is 165 degrees
Add to freezer bags if storing in freezer or can keep in refrigerator for 3-4 days
I spent last week in Austin. I love Austin. Great food, delicious cocktails and don’t even get me started on Torchy’s breakfast tacos!! In any case it made me start thinking about the bbq season. It’s finally warm and the rain has stopped here so time to clean that grill!
One of my first night staples when camping is tri-tip. Why is it a staple? Always a hit, I can cook different levels for different people’s preferences, and it makes for great leftovers in breakfast burritos!
So living in California where I do, we have an local bbq place that has amazing tri-tip so I won’t lie, I cheat on this recipe. However I thought I would do the post for anyone who wants a sure proof tri-tip!
If you live in the Bay Area, you can just cheat and go get an already marinated bag of Kinders tri-tip and throw it on the grill once you are set up at campsite. However if you don’t have a local one or need it to be cheaper given a larger group my suggestion is this –
Go to Costco and buy their large tri-tip – rule of thumb is 1/4 – 1/3 per person but I like leftovers for other meals so go 1/3 – 1/2 per person
Find at least 2-3 Kinders bottles of original marinade
Add meat to a large ziplock bag and add Kinders marinade
Seal bag and shake around to fully coat the meat
Marinate for at LEAST 24 hours
So for camping, I always marinate the night before the trip so it is ready to go when I get to the campsite the next day
For grilling – (I always do this on my small portable grill to control heat but if I was to do on a campfire, I would do in a large cast iron to control and even out heat)
Preheat grill or start campfire – if grilling, put cast iron over heat until hot to touch
Add meat fat side down to grill or campfire grill – if grilling on campfire put pan very close to fire for searing part and then move to indirect heat
Sear fat side down for 5 min and then flip for 5 more minutes
Continue to cook for 10-12 more minutes for medium rare, 20-25 for medium, 30-35 for medium well
Normally most my friends like medium rare so I cook to that, remove, cut the ends and add those back into a skillet and cook to medium well for the friends who want that
Serve with garlic bread, corn, salad and/or potatoes!
Also a personal favorite is pairing with a local wine from Buon Vino 🙂
Usually by the last night of camping, I try to either make a meal out of everything we have leftover or a meal mostly from cans. My last camping trip I decided to try making a chili based off of both because it’s usually what we have at the end – even some beer!
Ingredients –
1 medium onion, chopped
5 cloves minced garlic
1 green bell pepper chopped
2 jalapeño peppers chopped
1 can of Chipotle chili’s in adobo sauce
2 tablespoons tomato paste
1 28 oz can crushed tomatoes
1 16 oz can chicken broth
1 12 oz beer
1 can kidney beans, drained and rinsed
1 can black beans, drained and rinse
1 can pinto beans, drained and rinsed
2 tsp cumin
1 tsp Italian seasoning
1 tablespoon sugar
2 tsp Tabasco
Any leftover items you might have – cheddar cheese, sour cream, green onions…
Directions –
In a Dutch oven or cast iron pan, add a couple teaspoons of oil and create a thin layer on the bottom. Last summer I bought this pan from Macy’s and it worked great for this meal and fed four people easily!
Move pan closer to the flames and heat
Add the chopped onion and minced garlic until onion is soft
Add a bit of the adobo sauce from the chili can, tomato paste, peppers, cumin and Italian seasoning.
Stir and cook for about 3-5 minutes until peppers have softened
Add tomatoes, broth, and beer with the sugar and mix to combine
Move the pot away from the heat towards the edge of the campfire grill
Cover and let simmer for 20 minutes
Add beans and re-cover and cook for another 10-15 minutes
Remove from heat and serve into bowls
Add the toppings you have (sour cream, cheese) and serve with campfire cornbread – recipe to come!
Baseball season is finally here and with that being an Oakland A’s fan means many tailgates. I love tailgating for the friendship bonding time and getting to test out new recipes that sometimes make the camping menus on our trips.
Usually my bacon wrapped jalapeno poppers are a staple for tailgates but lately it seems like all my friends are either Keto, Paleo or vegetarian so for our first tailgate of the season, I wanted to come up with something that everyone could eat. So here I give you a meat option for those Keto and Paleo friends and a goat cheese option for the vegetarians.
Keto & Paleo Friendly Bell Beppers –
Ingredients:
Mini bell peppers – I grabbed the 1.5 lb at Costco
1 lb. Ground beef (or turkey but I feel beef has a lot more flavor)
Taco seasoning packet
1/2 to 3/4 cup Tomato sauce
Small onion
Tomatoes (optional)
Black olives (optional)
Directions:
Slice mini bell peppers in half and scrape out the seeds
Add a little bit of olive oil to pan and add and saute onions for a few minutes. Then add ground beef and cook fully.
Add taco seasoning to ground beef and the tomato sauce. I added enough sauce that it was coated but not watery. Let beef simmer for 5 minutes. Remove from heat.
Fill bell peppers with meat mixture
Top with tomatoes and olives if you want. The people in our group preferred no tomatoes or olives but really up to your audience
Create foil packets and add bell peppers to them. Grill for about 10 minutes or until the inside of the bell pepper looks heated through
Goat Cheese Mini Bell Peppers –
Ingredients:
Mini Bell Peppers
10.5 oz. Goat Cheese Log – I find the Kirkland brand 2 pack goat cheese logs at Costco the best for value
2/3 cup Shredded Parmesan Cheese
Three cloves of garlic, minced
2 – 4 Jalapenos (depending on spice level), seeded and chopped
Directions:
Slice mini bell peppers in half and scrape out the seeds
In a large bowl, combine softened goat cheese, diced jalapenos, minced garlic, and shredded parmesan cheese
Fill the mini bell peppers with the goat cheese mixture. Note: I find just using your hands is the easiest for this and I fill them to almost overflowing the brim of the peppers
Create foil packets and fill packets with bell peppers. Grill for about 10 minutes or until cheese looks heated through and oozing.
One of my favorite traditions is this week – Mardi Gras! Also known as Shrove Tuesday, Fat Tuesday and the main reason I love it – Pancake Tuesday. I love a good breakfast for dinner sometimes and during college, I always heated up my saucepan and put together crepes or pancakes with all the fixings for my roommates and I. Of course some hurricanes always paired nicely. So this week, I give you breakfast!
I make large batches of this mix before the summer starts so I always have it ready to go for camping trips throughout the season. It’s also great just for an easy breakfast on the weekends. Just bring this mix, a small thing of buttermilk and 2 eggs.
Fun camping hack! Before every trip, I crack open eggs into a large bowl and very slightly beat (just to fit through the funnel). I then use emptied and cleaned plastic water bottles that I collect before preparation and insert a funnel into one. Then pour the eggs in through the funnel until full. Seal tightly and save in the fridge until you load your cooler. Of course you can’t do any crazy egg varieties this way (sunny side up, over easy) but works great for scrambled eggs, breakfast burritos and recipes like this that ask for 2 eggs!
Also this is one recipe I do on my small propane grill that I also bring. You can very much do it on indirect heat in a cast iron on the campfire in the morning but I’m usually doing such a big breakfast, I’ll have both the small propane grill and campfire grill going at the same time and just end up doing the pancakes on the propane grill.
Last year I got these stack-able pots and pans that I absolutely LOVE (see above)! GSI Stackable Pots
They even come with a small cutting board. It saves on space when packing the car and gives you two pots, one saucepan and a cutting board all in the size of the big pan. Totally worth the money and less stress of trying to find the right pans to bring. If you are going to do the pancakes on the grill, I recommend a cast iron pan and melting a half stick of butter in the pan first to reduce sticking with the heat of a campfire.
Multi-use Baking Mix Recipe (adjust this to how much of a batch you want to make)-
3 cups Flour
1 tablespoon Sugar
1 tablespoon Baking Powder
1 teaspoon Baking Soda
1 teaspoon Salt
Recipe –
2 cups of Multi-use Baking Mix Recipe
2 cups (475 ml) buttermilk
2 eggs
Butter
Optional – chocolate chips, coconut, fruit slices you have at camp
In a large bowl, whisk together 2 cups baking mix, 2 cups buttermilk and two eggs until well blended.
Melt a little piece of butter in a medium saucepan (or half stick in a large cast iron). Put 1/4 cup batter at a time into the skillet.
If you want to add other items, spread on top of pancakes here. Chocolate chips are of course a big hit with the kid campers!
Cook edges look slightly brown and firm (about 3 – 5 min), then flip.
Cook other side until golden brown and firm.
Repeat until batter is gone.
I love to serve up with bacon and french pressed coffee!
Another fun tip – if you want to get people up at your campsite to start the day, start cooking bacon 😉
I love to make at least one pasta dish on a camping trip (see previous lasagna recipe) and what goes best with pasta? Garlic bread! It also just make a great snack or side dish for many meals. Warning – this garlic bread is highly addicting and I usually triple the portion you think normal people would eat when planning for the meal.
I think the first time I did this recipe while camping was at Mary Smith campground up near the town of Shasta. It’s a bit of a drive from the Bay Area but a pretty drive and the campground has nice hiking. Sadly when we went it was too cold to get into the water. Maybe next time!
Ingredients –
Loaf of French bread
2 to 2 1/2 sticks of butter – accept it, love it, trust me!
Garlic – I use at least 8-9 cloves
Italian seasoning
Parmesan cheese – shredded
Foil
Directions –
Cut french loaf in half longwise
Mince garlic to fine pieces
Mash room temp butter, minced garlic, a little bit of shredded Parmesan cheese and a couple teaspoons of Italian seasoning in a bowl until well combined
Spread garlic, cheese, butter mixture evenly on the two layers of bread
Top with more shredded Parmesan cheese
Put each loaf separately in a piece of foil and fold up so foil creates a boat and top of bread doesn’t touch top of foil
Place on indirect heat on campfire and cook for about 10 min or until bread is warmed and cheese on top is melted
Remove from heat and slice into 2 inch pieces or eat as whole (just kidding but you’ll want to)
This week marks the 10 year anniversary of my dad passing from ALS and I can’t think of a better way of remembering him with baseball with my sis. So as fate has it, an annual work conference that is normally earlier in the month got moved to this week and spring training starts on Thursday! I can’t wait to root on my boys in green and gold with my sis! So this week’s recipe is going to be my fan favorite (at least as my friends tell me) – bacon wrapped jalapenos!
I’ve tried a few different ways of how to cook these but I find the best to wrap tightly and cook in a layer of foil sheet but you can insert toothpicks and cook in pan or come up with your own new way. If you have a suggestion on best way to cook these, leave a comment. I love trying new ways but for now this has been the best way
Happy Sunday Funday everyone! I thought today I would bring to you another entrée and crowd pleaser for dinners while camping. I have to give my cousin Chrissy thanks for this one as she gave me the original recipe and some tips that I have added on to over the years. For example, I’ve added spinach because I like some greens. I’ve also played around with the type of meat I’ve added or don’t add at all.
I also have to mention that the last time I made this was this past July at my favorite camping site – Letts Lake.
The place is beautiful and the last five miles are unpaved to get there which is always a roll of the dice with my Prius but I’ve made it at least 3 out of the 4 times I’ve tried. I was fortunate to go literally two weeks before the Mendocino Complex Fire (specifically Ranch Fire) started and the campsite was evacuated and later burned in the same fire. I cried a good amount after learning it burned. But why do I even remember this so specifically? Because this was the first time I had the genius idea to add Italian sausage to my lasagna. The bees were so incredibly bad this past summer in California and the second I opened the sausage packet, hundreds of bees swarmed on me and the meat so quickly, that I had to abort the mission and ended up kicking the sausage a few feet away from the campsite. So next time, I will cook and cut the meat prior to going camping so I can quickly assemble and hopefully not have the swarm of bee issue. On the other note, while I won’t be able to enjoy Letts Lake this upcoming summer, hopefully it will be back open in 2020. I also pray all the animals and especially baby ducks are ok but the bees I will say I hope they won’t be returning (wishful thinking I know!)
So here you go – my and my cousin’s much loved combined lasagna recipe
Ingredients –
Oven Ready Lasagna Noodles
2 jars of Rao’s Marinara Pasta Sauce (this part is VERY important. Trust me – splurge and spend the $8 on a jar of delicious sauce – it makes all the difference)
1 bag Mozzarella Cheese
1 bag Cheddar Cheese
1 bag Parmesan Cheese
Any kind of cooked meat you would like
Any vegetables you might like (I like spinach and zuchinni)
Italian Seasoning
Cast Iron Pan
Foil
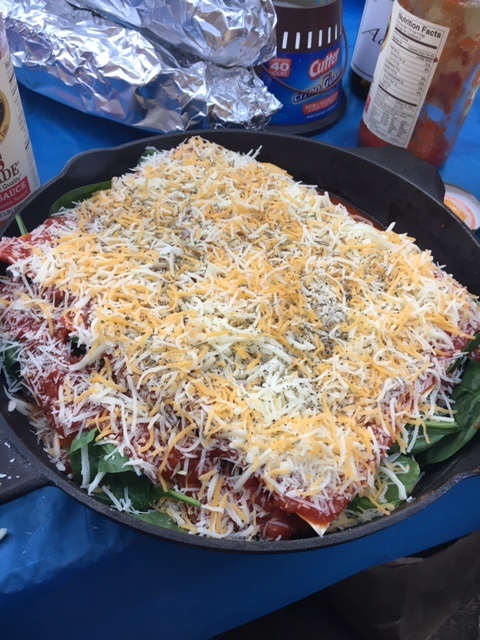
Directions –
Line the cast iron with double foil (spillage of the marinara sauce in the cast iron is a real pain to clean when camping)
Make a layer of oven ready lasagna noodles
Spread a portion of sauce over noodles
Add a part of the vegetables that you want evenly over sauce/noodles combo
Add any meat if you are having meat for the next layer
Add a layer of mozzarella and cheddar cheese
Add another layer of oven ready noodles
Add another portion of sauce over noodles
Repeat vegetables, meat and cheese layers
If you are now at the top of your cast iron, add sauce to cover, remaining mozzarella & cheddar cheese and as much of the parmesan cheese that looks good to you. Top with
Italian seasoning and cover pan with foil
Put cast iron pan on indirect heat over the campfire
Cook for about 45 min – an hour or when cheese is melted on top